Showing posts with label pattern. Show all posts

The Playhouse dress - It's Perfect Pattern Parcel #5!


Perfect Pattern Parcel #5 is here!! And is all about girls of all ages - from toddlers to tweens!

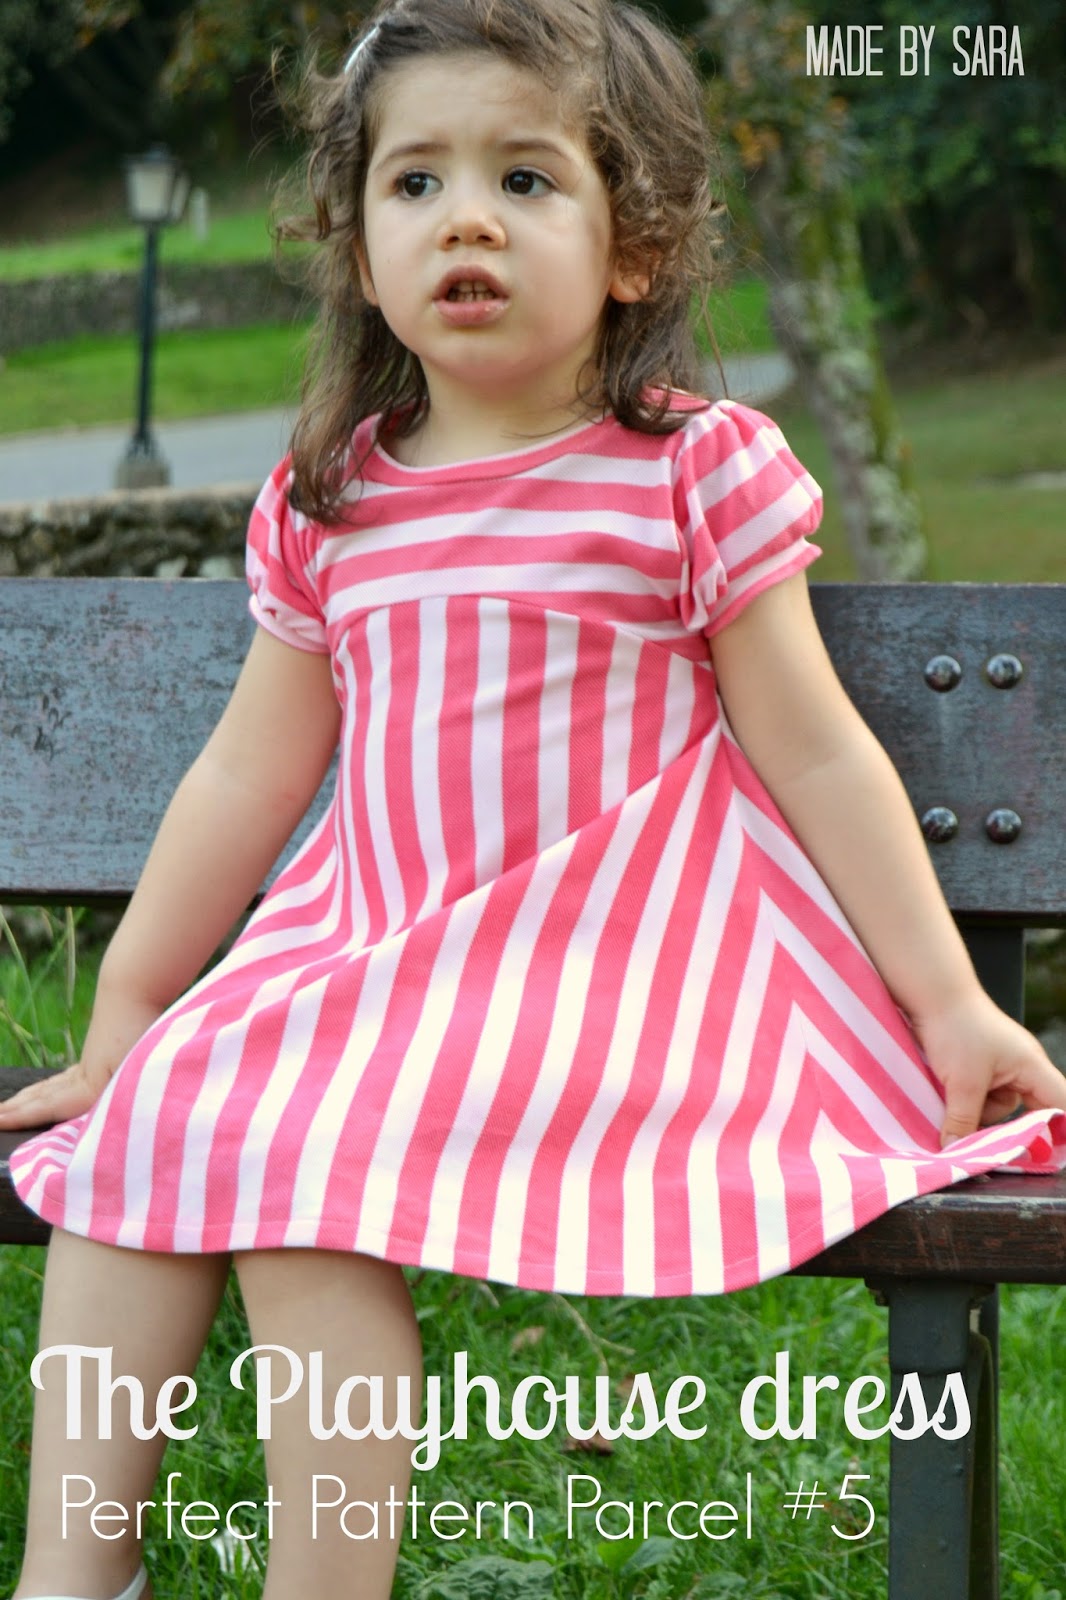
Pattern: Playhouse dress, pattern by Fishsticks Design
Fabric: flamingo striped piqué cotton knit (I love this knit! I have used it before here and here.)
Details:
This pattern is an easy sew and such a quick sewing project!
It comes with the option for puff short sleeves or long sleeves and it features a circular skirt. I had to make it in short sleeves since it is still very hot these days...
This dress can be made in knit or in a knit-woven mix!

About PPP#5!
It includes 6 patterns and it's a "name your price" deal! Isn't it amazing? And the best part is that it is all for a good cause! And wait, there is more! If you choose a price of $28 or greater you get a bonus pattern! You can read more and get it here.

Perfect Pattern Parcel believes in supporting independent pattern designers. It allows customers to show their support in naming their own price for each Parcel and it also encourages customers to allocate part of their Parcel price to the charity Donorschoose.org in order to help classrooms in need. Pattern Parcel donates all profits after expenses from Parcel sales to the charity as well. They have raised over $11,000 for classrooms in need!

So, Parcel #5 -  Girls and Tweens includes
  • Lily Knit Blazer by Peek-a-Boo Patterns
  • Everyday Yoga Pant for Girls by Greenstyle
  • Asymmetrical Drape Top by EYMM
  • Playhouse Dress by Fishstick Designs
  • Mimi Dress and Shirt by Filles a Maman
  • Bonus pattern: Sunki Dress by Figgy’s (it includes 18 months through a 16 tween sizing)

Pattern Parcel #5: Choose your own price and support DonorsChoose. Win/win

The story behind this post and my pattern choice:

It was very hard to choose what to make... I just wanted to make them all! If only I had the time... :)
First I was going to make a Sunki dress. I missed all the fun last year when it was released, and then again when it was the pattern to flip over Flip This Pattern. There were Sunkis everywhere around the sewing blogging community and I loved them all!! This was finally my opportunity to make one. But then I realized that this was the bonus pattern and that for the PPP#4 - boys edition - I had also chosen the bonus pattern. It was the Knight Hoodie and you can see it here. So I decided to give it a go on another pattern. And it had to be a dress. And it had to be in knit. :) 

My 3 year-old started pre-school this week. (she used to be at home with me)
We were told in July (when we applied) that the school didn't have a vacancy for her. This week, all of a sudden they gave us a phone call to let us know that a few kids had been transferred to other schools and thus she could finally go! My heart fainted... but she was thrilled!
So now I feel that I need to sew her up an entire school-proof, pratical and suitable for all the running and playing with other kids, wardrobe. Well, I can never have too many excuses to sew for my kids... 
I immediately thought... knits! Well, lucky me! PPP#5 is all about knits! It offers a pants patttern, several tops and dresses, and even a blazer. I won't need to look for anything more. :)

I have sewn this up for her first day at pre-school. Ans she loved it! In fact, she loved both the dress and going to school... She was so proud and happy for leaving home in the morning along with her brother and sister and her cute little backpack (with changing clothes because sometimes she still gets distracted... :) ) to go to school... And I was... well... feeling sad and lost. Last (school) year I was at home with my two girls, and now I am left alone every week day from 9am to 3.30pm. Well, almost. They all come home for lunch! :)

We went to the playground in the afternoon after school was over and she was oh-so-happy in her new knit dress. It is indeed very pratical!

I have already cut some knit for a Mimi shirt (I have made before a Marc shirt also from Filles à Maman and I loved it!) and a Lily blazer. Oh, and I will definitely make a couple of Sunkis for my girls. :)


Make sure to take a look at the inspiration tour!

Friday, September 19 Pienkel || Cookin' and Craftin'
Monday, September 22 Radiant Home Studio || Sewing Sober
Tuesday, September 23 Sew Fishsticks || La Pantigana || Amanda Rose
Wednesday,September 24 Shawnta Sews || Sprouting JubeJube || Knot Sew Normal
Thursday, September 25 Make It Perfect || Mimi's Mom || Climbing the Willow
Friday, September 26 Needle and Ted || Our Family Four
Saturday, September 27 Froo & Boo
Sunday, September 28 Stitches by Laura || Vicky Myers creations
Monday, September 29 Cookin' and Craftin' || The Crazy Tailor
Wednesday, October 1 lady and the gents || That's-Sew-Kari || Sewing Sober
Friday, October 3 sew chibi || Lulu & Celeste || Made by Sara


What will you be making with these awesome patterns?
If you haven't got them yet go get themYou have less then 24 hours! (tic-tac-tic-tac :) )

The Secret Garden Dress


This is the Secret Garden dress, pattern by Sprouting JubeJube and E+M.

This dress has two versions - the simplified and the flounce skirt, which features a beautiful bow effect at the back. I have opted for the simple version just because my girls need new clothes for Fall and the big bow would not be so pratical to wear with winter coats. Next Summer I will be making the flounce version - that back is really lovely.

I love the skirt in this dress. And the girls love it too! Look at all that twirl factor... Perfect, right?
The simplified version has a permanent sash and bow (it is sewn to the dress), but I have opted to make it interchangeable so we could change it to match shoes, blouses, hair bows... :)
For this photoshoot I had several options for the sash - a solid cotton in red, a floral cotton print, a blue satin and a black satin sash. She prefered the floral cotton print. I prefered the blue satin one. You can see both in the photos. Which one would you choose?

I would label this pattern as intermediate level. 
The bodice closes at the side with an invisible zipper (you can see it bellow). Although sometimes sewing them up can be a challenging task, I love invisible zippers. I was lucky to get this one right (with both seams matching) at first attempt. I have this super simple little trick and it seems to work great. ;)  
The bodice lining is set to place with an under stitch, and that my lovely readers, is a perfect construction method. Most dress patterns use top stitching all around the bodice neckline but I personally prefer methods with less top stitching (which in my opinion is over used...). 
It also requires a bit of hand sewing - which I love! (Hi, my name is Sara and I am a sewing nerd... :) ) Of course you can always just top stitch it, but in this case it won't be the same, since the stitching line would be just bellow the perfect "V" in the back... So grab a needle and go for a slip stitch by hand. You will be suprised as how quick it can be.

I have used a heavier fabric suitable for fall/winter weather (I *think* it is twill...) and she will be using it with a tee or a blouse underneath. I intended to make the photoshoot with that outfit - to show that this dress can also be worn for Fall/Winter - but the weather here is still very summery. In fact it was very hot this day so she asked not to wear the long sleeve blouse and the tights and winter shoes and I was totally okay with that. This is my hobby not hers, and I am really opposed to force or bribe my kids to make things and wear things just for the sake of me having the "perfect" blog post. ;) 

She was also not in the mood for standing still... so all I got were a bunch of blurry photos with her running and twirling all the time - can't blame her really... :)


Make sure to check the other participants blog posts for this pattern tour!


September 22 | Sofilantjes - From a Box - Golden Rippy
September 26 | Pienkel - Made by Sara - Rebel & Malice - Shaffer Sisters

There is an amazing giveaway for this tour! If you want to win several patterns just entry the rafflecopter bellow for a chance to win.
a Rafflecopter giveaway

If you are buying this pattern you can use a coupon code, good until Sep 27th. The code is "SGTOUR25" and it will give you a 25% discount for the purchase of the pattern in the E+M website as well as in the Etsy shop.


The Emerson top


Today I am part of the Emerson Dress and Top pattern tour.This pattern was designed by lovely Darcy from Ginger House Designs.

I have only good things to say about this pattern. 
Darcy won my heart when I saw the pattern pieces because they have... notches! 
I really think notches are very important on a pattern. If you would care about learning a bit more about notches I would suggest you to read this great article from my blogging friend Mie, from Sewing Like Mad, for Willow and Co.
The instructions are perfect, with a high professional look and with well designed illustrations.

Pattern and sewing details
The bodice is fully lined and as an option for a ruffle detail but I have opted for using piping instead (you already know I love piping, right?)
The dress and top can be made either with or without the flutter sleeves. I have opted to go with it since I can't resist flutter sleeves... :) These were actually really interesting to make because instead of hemming the edge - like most patterns -, this one suggests that we can finish the raw edge with a very small and narrow zig zag stitch in order to give it that look (see picture bellow). First I wasn't sure I was going to make it this way because I usually don't like exposed seams and raw edges, but I am glad I decided to give it a try because I really like the way it looks - that little fraying is kind of adorable. 
Both dress and top close at the back with a button placket.


Fabric
I opted for a rayon challys with a heart print. Super soft and drapey. A bit flimsy to work with but so great to wear.
I almost chose a thicker fabric - so it would go with a long sleeve tee underneath for her Fall wardrobe but then I opted for this summery fabric instead since we are still having some days with a great weather.


This little girl was so happy with her new top! "Hearts, mommy! See, I have hearts!" Well, my sweetie, you have one beautiful heart. You are kind, funny, and sweet, and you know deep down in your good heart when you did wrong and you are always truly sorry. You are a sweetheart.


Make sure to go check the other creations for this pattern tour. You will love the dress option! 

September 23 | Sprouting JubeJube
September 24 | Britches N Bloomers
September 25 | Rebel & Malice | Made by Sara
September 26 | Amanda Rose


The Meridian jacket


I was thrilled when I was asked by the lovely sisters from Frances Suzanne blog to join the September Showcase of Flip This Pattern - one of my favorite sewing series!
Unlike all previous editions, this month there was not a pattern to be flipped but 10 amazing patterns from rising indie designers to be showcased! Some of them are among my favorite!
Because in this edition it is all about supporting the indie designers, there was no competition and the guests could flip the chosen pattern or sew it as is. Surprisingly - because I love to flip - I didn't flip it. :) 

It was very hard to choose just one pattern from all ten available for the showcase, but I ended up making the Meridian cardigan or jacket from Imagine Gnats. I was eyeing this pattern since it was released. Well, it was the perfect timing now since my girls are in need of some cardigans and jackets for the chilly Fall weather that is already in the air and this pattern definitely is a wardrobe staple for this season.

Oh, and I have to confess I had a little helper for this post. She has been asking for so many months now that I would let her sew on my machine (since she doesn't have one... yet!). And I have been telling her "one day...". Well today was the day. :) She made herself a cowl! She was so, so happy! 


Jacket
Pattern: The Meridian jacket / cardigan by Imagine Gnats
Fabric: light weight denim (thin, drapey, a bit crisp) + printed knit, both from my local fabric store. The choice for denim was also because I will be linking this project to the Denim Challenge of Project Run & Play (season 10, week #3).
Details: The pattern asked for two woven fabrics for the jacket, or two knits for the cardigan. I have decided to live dangerously and used a very light weight denim on one side and a jersey knit on the other. I have sewn three buttons on the front and two buttons on each sleeve bottom. The pattern offers a collar option for the jacket version and although I love it I have decided not to make it.

Leggings 
Pattern: Basic Leggings by Serger Pepper.
Fabric: red knit.
Details: This pattern is great! I already have a couple more leggings cut out ready to be sewn. I opted not to make the leg cuffs - I hemmed instead.
A curious fact: I was Irene's first customer! :) Not long after, she invited me to guest post on her blog - if you need any tips, ideas or tutorials on sewing with denim go check it here! Irene is a super friendly italian lady who loves to sew and to offer free patterns and great sewing tips on her blog.

Cowl
Pattern: Camper Cowl by Jennuine Designs.
Fabric: both the same as for the jacket.
Details: This pattern is a super easy kids project. And such a quick sew! I would say it took less than 15 minutes for printing, cutting and sewing! 
First I thought about making another infinity scarf  - which I blogged about, with a free tutorial, here - , but I always LOVE to try new patterns so I had to go for this cowl.
This was the very first project my little girl have sewn on a real sewing machine, so it will always be a special pattern for both of us. (Sorry for all the lameness here, okay? :) )


Go check all the patterns and the guest bloggers versions on September ShowcaseThey are amazing! 
I really love some of these patterns! (The ones I know of.) I have made the Small Fry Skinny jeans here - the best jeans pattern ever! I had the chance to test the Fawn Lily dress here - such a unique design and construction... And I have also tested the Betty skirt which my girl chose for her first day at kindergarten outfit, here. :) I can't wait to make the other patterns. I already have cut fabric for a Shandiin top and a Serendipity swing coat (which I know is an awesome pattern because I already made the blouse and pants from this pattern collection, here).


Join all the fun by linking anything you've made from a pattern of a rising indie pattern designer to the September Showcase linky party!

[Discount and Giveaway alert!!] Oh, and did I mention that the ten featured designers were so generous as to offer great discounts on their patterns? Go and grab some! (They will run through Sep 20th) You will be supporting these amazing rising indie pattern designers. Nevertheless, you may want to take your chance on this amazing giveaway - just entry the rafflecopter bellow!

a Rafflecopter giveaway

I am posting today along with three huber talented ladies! Go check their versions of the Meridian cardi or jacket - Call Ajaire, Pienkel and Sweeter Than It Seams.

Thank you Ashley and Emily for having me on this fabulous showcase! And thank you Rachael for this cool pattern! 


Project linked to: 
Project Run and Play - season 10

An Outfit for School


If you have seen my last post you were already expecting this - it is the Sewing for Kindergarten sequel! :) I made an outfit for my kindergarten girl but... she had plans of her own! Although she loved the other one this is what she chose for her first day of school.


Skirt
Pattern: the Betty skirt from the Shaffer Sisters.
Fabric: very light weight denim from my local fabric store.
Details: There are so many options to this pattern! You will get lot of skirt patterns in just one pattern. This pattern has been improved and re-released very recently. I had purchased the first version - a few months ago (on this day). In fact I was their first international customer - how fun is that? :)
I opted for the large pleated skirt - I love pleats! And they are actually very easy to sew. I had to add something to that plain denim so I ended up adding some striped piping that was sitting on my stash. 
She sure does know how to choose her clothes - pleats scream for school don't you think? At least here, where I live, school uniforms are all about pleats. :) Oh, and did you notice the twirling factor on this skirt? She thinks it's perfect!


Tank tee
Pattern: the Hip Hop tank from Love Notions.
Fabric: two color coordinated knits from my local fabric store.
Details: This top was made several months ago as a pattern testing and has been worn several times ever since! She loves it! The fit is spot on, the instructions are very clear and it is a quick sew! 
It also comes with several options: basic tank (this one), the tulip tank, a gathered skirt option, and a button placket (on the back) option - these last options can be made with a mix of knit and woven. It is a summer staple for sure! Oh, and you can make a "mommy and me" look, because this pattern is also available in women sizes.
I have to say I didn't felt very comfortable at first by mixing those two patterns - I tend to play safe when it comes to colors and prints... (with a few exceptions, like this Matinée dress) -, but I think it turned out great.

Cardigan
It is the Aster cardigan from LBG Studio for Willow and Co., and you can read all about it on my last post, here!

So, first day of Kindergarten is almost here... Let's see how this girl handles it after being one whole year with her mom at home... ;)

Go take a look at all the cool outfits that some amazing bloggers made for the Sewing for Kindergarten series, hosted by Mie from Sewing Like Mad
Today is the last day and I am really excited to see what two of my favorite ladies from the indie sewing community have made - Celina from Petit à Petit and Family (she made 5(!) fabulous outfits!!) and Laura from Craftstorming (who is showcasing 3 great new patterns to be released soon!) - A.M.A.Z.I.N.G!


A birthday dress for sweet little R


This photo is here solely for an aditional dose of «adorableness»
As a mom one of the most difficult things for me is to deal with the fact that my kids are growing too fast and that soon I won't have cuddling babies and happy funny kids around... (How is that for a depressing first line of a blog post, haha!) Well, my youngest and probably the last, my sweet little one, turned three last weekend! But she is definitely still my baby. ;) (Until she turns four. Or five. Or forty.)

She is the most funny, sweet, happy, smiley little girl. She is also a cuddler, the only cuddler of all three of them. 
(Can a mom have a favorite child? :) )

I made her this dress a few weeks ago, as a pattern testing. I decided then that it would be her birthday dress, thus the fabric choice - coral linen (I think this color looks great on her, don't you think?) and a floral print (whatelse?) :) ) viscose (a very soft and drapey fabric that looks and feels like the softest cotton - I love it!).

The pattern is the Polly dress - the debut pattern from Bubby and Me creations

I can't actually say why but I love to test debut patterns... It is a completely shot in the dark because you never know what you will find about the pattern pieces, the instructions and the construction methods. It can go smoothly or it can be very bad. In this case I loved it! 

As much as I am not a ruffles-everywhere-the-more-the-merrier kind of person I love ruffles in a good measure and in this case the ruffles over the shoulders and going a bit down the chest are a lovely detail. I did took off about 3 inches on the ruffle piece - so 6 inches total, since it is cut on the fold. 
I have also have add faux piping on the neckline and flat piping on the chest seam - the pattern doesn't ask for those but you know me... it's all about the little details. :)
I love that this dress closes at the back with a button + loop - pretty much easy, right?

I found this dress to be very easy to make and a quick sew! The instructions are very detailed and full of clear photos for all the steps. Nikki (a lovely australian mom) did a very great job on this first pattern! (Size range is 1-10 years.)

This little one as the best sweetest smile ever... And no, I am not biased. It's a true fact. :)
She had a very happy birthday and was oh-so happy in her new mommy-made dress. Well, I think she loved the birthday girl's golden crown even better but who can blame her? :) 

Oh, and I am sorry for the huge dose of cuteness overload on this blog post. (Not!)


Uma das coisas mais difíceis para mim como mãe é lidar com o facto de que os meus filhos estão a crescer rápido demais, e que daqui a nada já não terei nenhum bebé fofo nem crianças alegres e engraçadas à minha volta... (Bem, este foi um início de publicação um pouco deprimente, não? :) ) A minha filha mais nova, e provavelmente a última, a minha doçurinha, fez três anos no fim-de-semana passado. Mas continua a ser a minha bebé. :) (Até fazer os quatro anos. Ou os cinco. Ou quarenta.)

Ela é a criança mais alegre, divertida, boa-onda, sorridente... E é também a mais mimalha (o que é diferente de ser mimada) dos três. 
(Será que uma mãe pode ter um filho predilecto?... :) )

Fiz este vestido há umas semanas atrás, num teste ao molde. Decidi logo que ia ser o vestido de aniversário, daí a escolha de um tecido mais nobre - o linho, de cor coral (a cor fica-lhe lindamente, não fica?). Usei também, para os folhos, uma viscose com uma estampa floral (o que mais poderia ser? :) ) - é um tecido super suave e com um drapeado maravilhoso.

O molde é o vestido  Polly - o molde de estreia da marca Bubby and Me creations.

Não consigo explicar porquê, mas gosto bastante de testar moldes que sejam o primeiro molde de um designer/marca. O que é um completo tiro no escuro... Não faço ideia como serão as peças do molde, as instruções, a própria construção. O teste ao molde pode ser um pesadelo ou correr muito bem. Neste caso, gostei imenso!

Por muito que não seja um pessoa do tipo adoro-montes-de-folhos-quantos-mais-melhor, confesso que gosto de alguns folhos - na medida certa, no sítio certo, na peça certa. Neste vestido os folhos dão a imagem à peça e são um detalhe bem amoroso. Apesar disso, acabei por fazer uma alteração ao molde original: retirei cerca de 7 centímetros da peça do molde  - ou seja, 14 centímetros no total, já que a peça é cortada na dobra do tecido.
Acrescentei um viés falso no decote e viés achatado na costura da linha do peito - não são um requisito do  molde, mas já me conhecem... Gosto dos pequenos detalhes! :)
Outro pormenor amoroso é a forma como o vestido fecha - atrás com uma aselha e um único botão. Super simples, certo?

Este vestido é muito fácil de fazer e rápido! As instruções são muito detalhadas e cheias de fotografias de todos os passos. A Nikki (uma mamã australiana com um micro negócio de costura) fez um óptimo trabalho com este seu primeiro molde! (Está disponível para as idades de 1 ano aos 10.)

Esta pequenina tem o sorriso mais doce de sempre... E não, não estou a ser parcial. É um facto! :)
Teve um dia de aniversário muito divertido e estava super feliz com o seu vestido feito pela mamã. Bem, na verdade acho que ela ainda gostou mais da sua coroa dourada de aniversariante, mas quem é que pode censurá-la? :)

Ah, e peço desculpa pela dose exagerada de fofura nesta publicação. :)